 Windows Server 2003 was like XP. Everyone loved it and never wanted to move off of it. And just like XP, the time is coming quickly where you will need to move away from the much loved server or become vulnerable to threats very quickly. Once support has ended for Windows Server 2003 there will be no more security patches, but the threats will still be there.
One of the most common systems that I see on Windows Server 2003 these days is Active Directory. That tends to be true since moving Active Directory can be a long and tedious process. It can also cause numerous issues along the way.
Below is a basic guide on upgrading your Windows Server 2003 Active Directory to Windows Server 2012 R2. I would not recommend doing this on your own. This is something that takes planning and careful consideration. Projects like this are where companies such as Custom Systems are a perfect choice.
In case you were not aware, End of Life (EOL) for support of Windows Server 2003 is currently slated for July 14, 2015. That date is fast approaching and will be here before you know it. Make sure to plan for these upgrades with ample time to complete them.
I will not get into what Active Directory is and what it does, as it provides authentication and authorization services as well as a framework for other related services that can be deployed.
The below guide is only a reference and should not be considered the perfect solution for all upgrades. Each upgrade will differ and will require extensive planning. This guide assumes that you have a 2012 R2 server installed as well as have installed the Active Directory role. Again this guide is not to be followed without proper planning and assistance.
First step is to Transfer the Flexible Single Master Operations (FSMO) Role
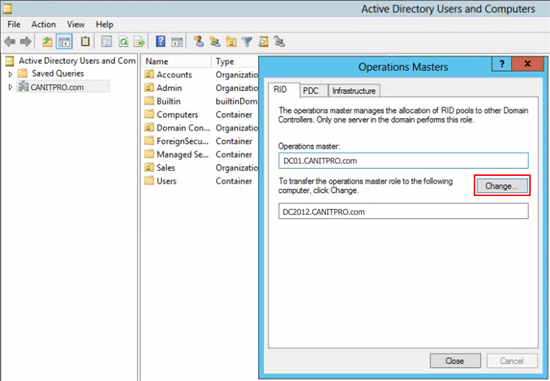
- Open the Active Directory Users and Computers console on your new Windows Server 2012 R2 computer.
- Right click your domain and select Operations Masters in the sub menu.
- In the Operations Masters window, ensure the RID tab is selected.
- Select the Change button.
- Select yes when asked about transferring the Operations Master role.
- Once the Operations Master role has successfully transferred, click OK to continue.
- Ensure the Operations Master box now shows your new 2012 R2 Windows Server.
- Repeat steps 4 to 6 for the PDC and Infrastructure tabs.
- Once completed, click Close to close the Operations Masters window.
- Close the Active Directory Users and Computers window.
Changing the Active Directory Domain Controller
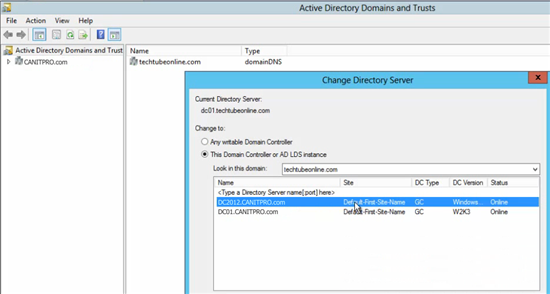
- Open the Active Directory Domains and Trusts console on your new Windows Server 2012 R2 computer.
- Right click your domain and select Change Active Directory Domain Controller… in the sub menu.
- In the Change Directory Server window, select This Domain Controller or AD LDS instance.
- Select your new 2012 R2 Windows Server.
- Click OK to continue.
- Back in the Active Directory Domains and Trusts window, hover over the Active Directory Domains and Trusts found in the folder tree on the left hand side to ensure the server now reflects your new 2012 R2 Windows server.
- Right click Active Directory Domains and Trusts found in the folder tree and select Operations Manager… in the sub menu.
- In the Operations Master window, click Change to transfer the domain naming master role to the 2012 R2 Windows Server.
- When asked if you are sure you wish to transfer the operations master role to a different computer, click yes.
- Once the operations master is successfully transferred, click OK to continue.
- Click Close to close the Operations Master window.
- Close the Active Directory Domains and Trusts console.
Changing the Schema Master
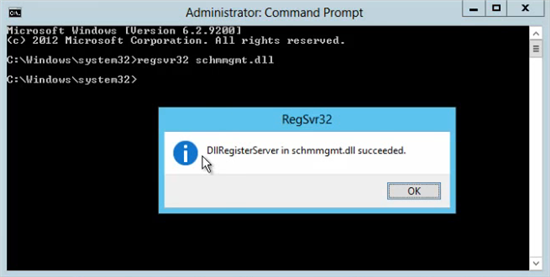
- Open a command prompt in administration view on your new Windows Server 2012 R2 computer.
- On the command prompt window, enter regsvr32 schmmgmt.dll and hit enter.
- Once completed successfully, click OK to close the RegSvr32 window.
- Close the command prompt.
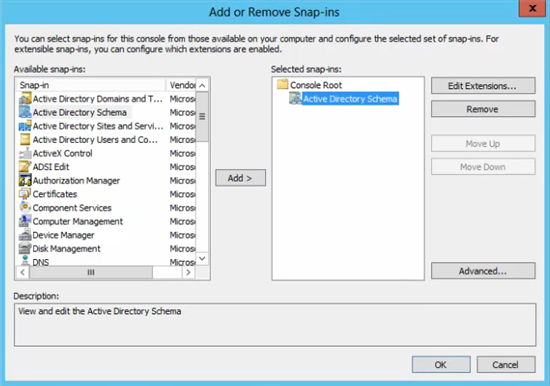
Add the Active Directory Schema Console from MMC
- Open a MMC console on your new Windows Server 2012 R2 computer.
- Click File > Add/Remove Snap-in…
- In the Add or Remove Snap-ins window, select Active Directory Schema and click the Add > button.
- Click OK to continue.
Change the Schema Master
- In the same MMC console, right click Active Directory Schema and select Change Active Directory Domain Controller… in the sub menu.
- In the Change Directory Server window, select This Domain Controller or AD LDS instance.
- Select your new 2012 R2 Windows Server.
- Click OK to continue.
- A warning will appear stating that the Active Directory Schema snap-in in not connected. Click OK to continue.
- Hover over the Active Directory Schema folder in the folder tree to ensure the new Windows Server 2012 R2 computer is shown.
- Now right click Active Directory Schema and select Operations Master… in the sub menu.
- In the Change Schema Master window, click Change to transfer the schema master role to the 2012 R2 Windows Server.
- When asked if you are sure you wish to transfer the schema master role to a different computer, click yes.
- Once the schema master is successfully transferred, click OK to continue.
- Click Close to close the Change Schema Master window.
- In the MMC, click File > Exit.
- When asked to save the console, click No.
Once completed, open the Active Directory Users and Computers console to verify that the Active Directory database successfully replicated to your new Windows Server 2012 R2 computer. Be aware that the database replication may take some time depending on the number of objects in Active Directory.
Removing the 2003 Windows Server from the Global Catalog Server
- Open Active Directory Sites and Services on your new Windows Server 2012 R2 computer.
- Expand the Sites folder, then the Default-First-Site-Name folder, then the Servers folder.
- Expand both listed servers. One should be your new Windows Server 2012 R2 and one should be your Windows Server 2003.
- Right click NTDS Settings found under your old 2003 Windows Server.
- In the sub menu, select Properties.
- Under the General Tab, unselect Global Catalog and then click the Apply button.
- Click OK to continue.
- Close the Active Directory Sites and Services window.
- Verify that your new 2012 R2 Windows Server is running the FSMO role by opening the command prompt in Administrative view and running the following command: Netdom query fsmo.
- In the Network and Sharing Center, be sure to change the Preferred DNS server to match the Alternate DNS server, then delete the IP address listed under the Alternate DNS server should it currently be pointed to the old 2003 Windows Server.
All that’s left is to demote the old 2003 Windows server by first adding the new 2012 R2 Windows Server as the Primary DNS, followed by running DCPROMO (which is deprecated in Server 2012) to demote the old 2003 Windows server.
As I stated earlier, this is a basic guide to help you understand what to expect during a Windows Server upgrade. As always, please post your comments and questions below or email me directly.